Part 5A: Displaying Columns in Alternate Colors
While alternate row colors are a common feature of data tables, we see alternately colored columns less frequently. However, they can be a helpful way to show groupings of data.
Before we can get started, you need to download the following file. Once you decompress the file, open it in both a text editor and in your browser.
Before we can get started, you need to download the following file. Once you decompress the file, open it in both a text editor and in your browser.
|
| ||
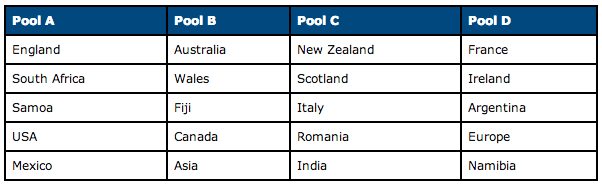
If we use the col element to describe our table’s columns, we can employ CSS to add a background to those columns.
To get started, right below our table tag, we simply add a col element <col /> for each of the columns in our table. In our case we have four columns, so we need to put in the following in the space immediately below the <table> tag. Do not make a duplicate table tag or add all the ....
<table>
<col />
<col />
<col />
<col />
......
......
......
There is no sense giving you a nice screenshot to look at, because it won't look any different than the previous image.
|
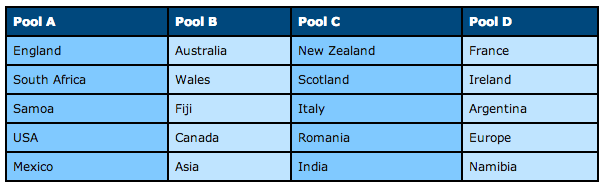
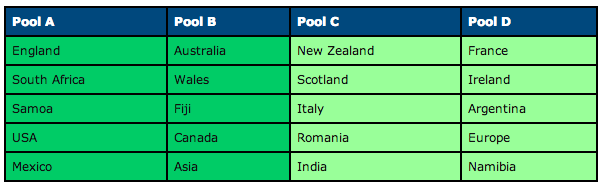
We can add style rules for our col elements using nth-child as shown here:
col:nth-child(odd) { background-color: #80c9ff; color: #000; } col:nth-child(even) { background-color: #bfe4ff; color: #000; } Hmmmm... kind of looks similar to how we used nth-child when we were alternating row color. |
|
As you can clearly see, the col element provides us with further flexibility for styling a table’s columns, thus making our table attractive and easier to understand.
Before we continue on, we can make our table look even better if we go in and tweak the colors we specified for the borders in the <th> and <td> rules in our style section. Instead of using #000000 (black), try changing them to #ffffff (white)
Before we continue on, we can make our table look even better if we go in and tweak the colors we specified for the borders in the <th> and <td> rules in our style section. Instead of using #000000 (black), try changing them to #ffffff (white)
Part 5B: Nested Col Elements
It’s also possible to nest col elements within a colgroup element, which allows us to change the column’s appearance by applying style rules to the parent colgroup element.
Before we can get started, you need to download the following file. Once you decompress the file, open it in both a text editor and in your browser.
Before we can get started, you need to download the following file. Once you decompress the file, open it in both a text editor and in your browser.
|
| ||
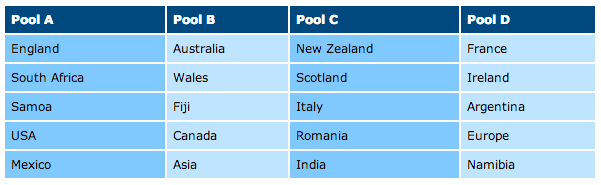
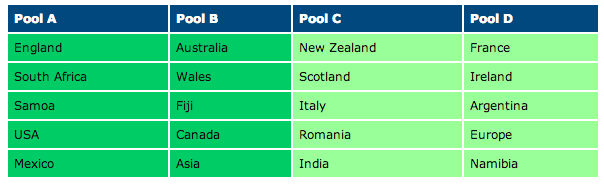
Again, we have four columns, but this time we want to style the columns so that Pool A and B are the same, while Pool C and D are similar. This would imply that eventually the winner of Pool A would play the victor of Pool B. Similarly, Pool C and D winners would duke it out.
To do this, we need to create 2 column groups, each consisting of two columns in the space immediately below the <table> tag. Do not make a duplicate table tag or add all the ....
<table>
<colgroup>
<col />
<col />
</colgroup>
<colgroup>
<col />
<col />
</colgroup>
......
......
......
Again, there is no sense giving you a nice screenshot to look at, because it won't look any different than the previous image.
|
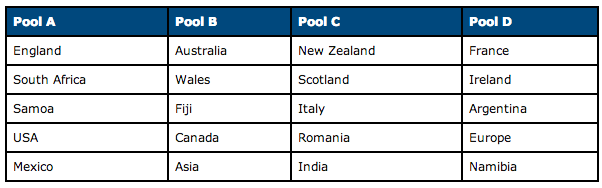
Now we simply apply those styles to the colgroup element rather than col:
colgroup:nth-child(odd) { background-color: #00cc66; color: #000; } colgroup:nth-child(even) { background-color: #99ff99; color: #000; } |
|
As you can clearly see, the colgroup element provides us with further tools for styling a table’s columns, thus displaying data in a manner that encourages the viewer or reader to make a few mental connections or comparisons. In this case... which two teams in each division will face off in the semi-finals.
As we did in Part 5A, we can make our table look even better if we go in and tweak the colors we specified for the borders in the <th> and <td> rules in our style section. Instead of using #000000 (black), try changing them to #ffffff (white)
As we did in Part 5A, we can make our table look even better if we go in and tweak the colors we specified for the borders in the <th> and <td> rules in our style section. Instead of using #000000 (black), try changing them to #ffffff (white)
In Summary:
In this lesson hopefully you've discovered that tables are alive and well—when used for their original purpose of displaying tabular data, that is! CSS gives you the ability to turn data tables into really attractive interface items, without negatively impacting their accessibility. So, please, embrace tables and use them to display tabular data—that’s their job!
Also, I want you to remember that lots of the CSS we have used to style parts of our table can be applied to other elements. For instance:
The point I am getting at... explore and have fun. Learn to apply the CSS you were introduced to in this lesson to other elements and parts of your page. Don't force yourself to learn in isolation.
Also, I want you to remember that lots of the CSS we have used to style parts of our table can be applied to other elements. For instance:
- borders around images, headers, or paragraphs
- background and text color for different elements: headers, lists, paragraphs, or div sections
- changing the color of a horizontal rule
- fonts and alignment used in a document or a paragraph
- changing the margins or paddings of a whole page or a specific header or paragraph or table cell
- using first-child to make the first <h1> of a page having a different style then all the other <h1> elements on the page, or the first paragraph having a different indentation
- using margin-left or margin-right combined with border-bottom and border-top to create a block or pulled quote effect
The point I am getting at... explore and have fun. Learn to apply the CSS you were introduced to in this lesson to other elements and parts of your page. Don't force yourself to learn in isolation.
Assignment: Tabular Data - Stylized Table
Your task is to create a stylized table within your website project that showcases much of what you have learned during this lesson on tables. For instance, you might create a zebra-striped table where every other row is a different color that utilizes a hover roll over effect.
Before starting this assignment, I want you duplicate your entire CSS website folder. The name of this second folder should include the word afterCSS.
For instance:
If my original folder is called TourismVancouver, my second folder might be called TourismVancouver_afterCSS
When creating the CSS for your the table in your afterCSS site, either enter the CSS directly into the HTML file using the <style> tag or link it as a separate style sheet. The advantage of a separate style sheet is that all of your styles could easily be applied to other tables within your site. For instance, player stats for individual hockey players when each player has their own profile page.
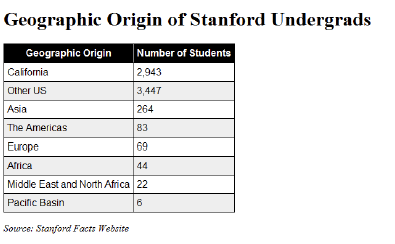
In it's absolute simplest form, this is what your webpage table might look like:
Before starting this assignment, I want you duplicate your entire CSS website folder. The name of this second folder should include the word afterCSS.
For instance:
If my original folder is called TourismVancouver, my second folder might be called TourismVancouver_afterCSS
When creating the CSS for your the table in your afterCSS site, either enter the CSS directly into the HTML file using the <style> tag or link it as a separate style sheet. The advantage of a separate style sheet is that all of your styles could easily be applied to other tables within your site. For instance, player stats for individual hockey players when each player has their own profile page.
In it's absolute simplest form, this is what your webpage table might look like:
Keep in mind the following details: (Remember, these are suggestions)
What I want to see here is a big difference in your before and after versions of your table.
For this assignment, their are some ways to get bonus marks:
When you are finished your table, be brave an try to apply some of the CSS you have been learning to other parts of your afterCSS site.
- Make sure that you are working within your duplicate site. Part of the purpose of this unit is to be able to compare the two versions of your page in separate files. Before and after the application of CSS.
- (If you are doing a practice table for now as you are behind in your content creation of the original site, you could use a combination of <div> tags and classes so that you can have two tables on the same page that are styled differently. This way, your final page could show both your before and after tables.
- Use the border-collapse property on the table, otherwise all your table cells will end up with double borders.
- The heading at the top and website citation information at the bottom are in the default serif font, whereas the table itself is in sans-serif. In addition, the citation at the bottom should be in italics (but don’t use the <i> italics tag for this, that’s not semantic HTML). Again... just suggestions.
- Utilize contrasting color scheme so that the table header row really stands out from the rest of the table.
- It is ok to choose a different colour scheme providing the contrast is maintained and the focus is on the header row
- Make sure the before and after sites are viewable from within your weebly acount (hint.... put them in your dropbox or comparable folder)
What I want to see here is a big difference in your before and after versions of your table.
For this assignment, their are some ways to get bonus marks:
- You could create a copy of your page and experiment with using classes for the odd rows and for the last row and avoid using the fancy :nth CSS3 style selector that makes zebra-stripping easy. This way you get some practice using the class attribute which will be generally useful for a wide range of tasks.
- Apply a variety of different CSS techniques. Use some you already know or they you find out on your own.
- You could utilize CSS to create different versions of your table.
When you are finished your table, be brave an try to apply some of the CSS you have been learning to other parts of your afterCSS site.
Check out:
http://www.w3schools.com/cssref/css_animatable.asp
http://www.w3schools.com/cssref/css_animatable.asp